
In December 2021, the world’s largest crypto-native funding agency, Paradigm Lab’s CTO Georgios launched a weblog concerning the discharge of a brand new framework for (evm-based) good contract improvement, known as Foundry.
It took the Crypto group by storm, and shortly grew to become the trade normal for improvement and testing of good contracts, owing a lot to its effectivity compared to different frameworks.
With a purpose to perceive the importance of Foundry, we have to first look into the issues it tries to unravel.
The principle drawback that lies with frameworks like Hardhat and Truffle is that they require the builders to know a scripting language like JavaScript/TypeScript as a way to work with the framework.
As these scripting languages are net development-heavy, the solidity developer needn’t know such languages for the good contract improvement as it’s thought-about extra backend oriented.
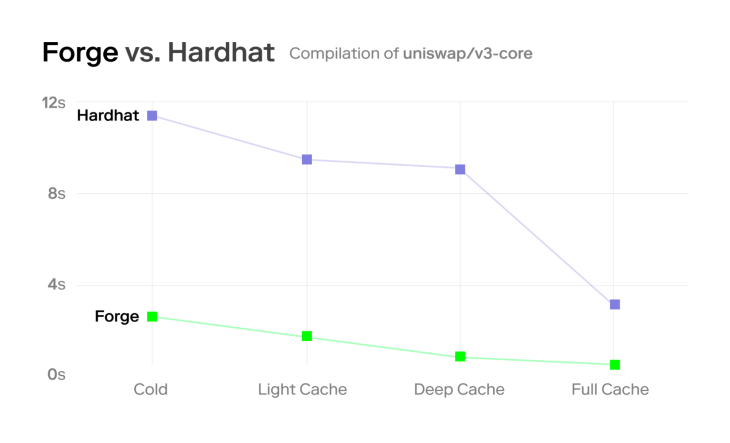
One other concern is that hardhat itself is carried out utilizing TypeScript, so it’s slower than Foundry because the latter is carried out utilizing Rust.
(Observe: In case you are all for checking the benchmarks, please take a look at this simulation)

Foundry has a whole lot of cool options except for this like:
- Name stack traces
- Interactive debugger
- Inbuilt-fuzzing
- Solidity scripting
Now, I hope you’ve gotten an outline of Foundry and the need of testing good contracts utilizing Solidity. Foundry ships with two superb CLI instruments out-of-the-box:
- Forge: Used for testing and deployment of good contracts
- Forged: Used to work together with deployed good contracts
On this article we’re going to cowl the next:
Let’s get began.
Putting in Foundry
Putting in Foundry is straightforward and simple.
Open up your terminal and run:
curl -L https://foundry.paradigm.xyz | bash && foundryup
As soon as Foundry is put in, you can begin utilizing Forge and Forged straightaway.
For some OS, you may wish to install rust earlier than putting in Foundry.
Organising a Foundry undertaking
You’ll be able to immediately setup a Foundry undertaking by straight away by working
forge init <PROJECT_NAME>
To make your life simpler, I’ve created a template repository, with which you will get began extra simply. It incorporates the required libraries, scripts and listing setup. So, all you’ll want to do is simply run the next command in your terminal:
The above command creates a brand new listing known as foundry-faucet and initializes a brand new Foundry undertaking utilizing my template. This may be the listing construction. The necessary directories and information that we wish to deal with are:
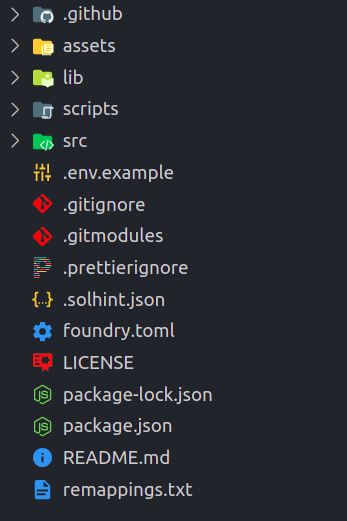

- lib: This incorporates all of the dependencies/libraries that we’re going to use. For instance, if we wanna use Solmate, it can reside as a git submodule inside this folder
- scripts: This folder has all of the scripts, like deploying and verifying contracts
- src: This folder has all of the contracts and the checks related to the contracts
- foundry.toml: This file incorporates the configuration choices for the present Foundry undertaking
We must also replace and set up the libraries used; for that run the next instructions:
git submodule replace --init --recursive
forge set up
Making a easy Faucet contract
Now, we’re going to implement a faucet contract for our ERC20 token which may drip tokens when requested. We are able to additionally prohibit the quantity of tokens per request by setting a restrict which will likely be 100 by default in our contract.
Open up the src/Faucet.sol file and add the next code:
// SPDX-License-Identifier: UNLICENSED
pragma solidity 0.8.13;

import {Ownable} from "openzeppelin-contracts/entry/Ownable.sol";
import {IERC20} from "openzeppelin-contracts/token/ERC20/IERC20.sol";

contract Faucet is Ownable {
   /// Handle of the token that this faucet drips
   IERC20 public token;

   /// For fee limiting
   mapping(deal with => uint256) public nextRequestAt;
   /// Max token restrict per request
   uint256 public restrict = 100;

   /// @param _token The deal with of the tap's token
   constructor(IERC20 _token) {
       token = _token;
   }

   /// Used to ship the tokens
   /// @param _recipient The deal with of the tokens recipient
   /// @param _amount The quantity of tokens required from the tap
   perform drip(deal with _recipient, uint256 _amount) exterior {
       require(_recipient != deal with(0), "INVALID_RECIPIENT");

       require(_amount <= restrict, "EXCEEDS_LIMIT");

       require(nextRequestAt[_recipient] <= block.timestamp, "TRY_LATER");
       nextRequestAt[_recipient] = block.timestamp + (5 minutes);

       token.switch(_recipient, _amount);
   }

   /// Used to set the max restrict per request
   /// @dev This technique is restricted and must be known as solely by the proprietor
   /// @param _limit The brand new restrict for the tokens per request
   perform setLimit(uint256 _limit) exterior onlyOwner {
       restrict = _limit;
   }
}
Our faucet contract has been added. Now we will go forward and compile the contracts by working:
forge construct
If every part goes effectively, it’s best to see the same output:
[⠒] Compiling...
[⠒] Compiling 14 information with 0.8.13
Compiler run profitable
Candy! We’ve efficiently arrange our Foundry undertaking and compiled our contract with none errors! Good job, anon 🎉
Now, we will go forward and begin testing our Faucet contract.
Unit testing utilizing Forge
As , not like Hardhat, Forge helps us write unit checks utilizing Solidity.
When you open the src/take a look at/Faucet.t.sol file you’ll already see some imports of utils and a BaseSetup contract.
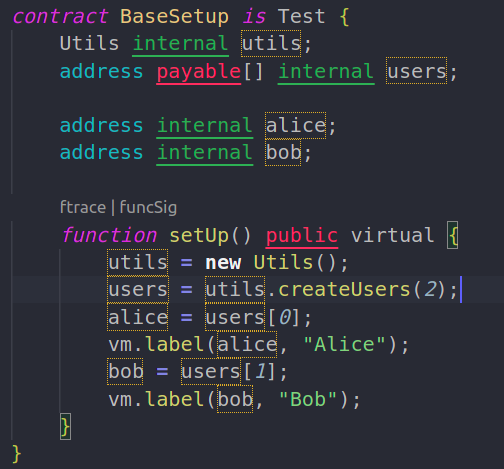

It has some preliminary setup that initializes a couple of variables that we will use in our checks. As well as, the setUp() perform is much like beforeEach in hardhat and it runs earlier than each take a look at.
The setUp() perform creates two addresses and labels them Alice and Bob. It’s useful whenever you attempt to debug by way of name traces because the label seems within the traces together with the deal with.
(Observe: vm.label known as a cheatcode and it’s particular to Forge; It helps us to do some particular operations by interacting with the digital machine within the take a look at env. We’ll be seeing extra cheatcodes through the course of the article. For the total record of cheatcodes, you possibly can refer to this link)
Change the Faucet.t.sol with the next code to get began with the unit checks;
Extra nice articles from LogRocket:
// SPDX-License-Identifier: MIT
pragma solidity >=0.8;

import {console} from "forge-std/console.sol";
import {stdStorage, StdStorage, Check} from "forge-std/Check.sol";
import {IERC20} from "openzeppelin-contracts/token/ERC20/IERC20.sol";

import {Utils} from "./utils/Utils.sol";
import {Faucet} from "../Faucet.sol";
import {MockERC20} from "../MockERC20.sol";

contract BaseSetup is Check {
   Utils inner utils;
   Faucet inner faucet;
   MockERC20 inner token;

   deal with payable[] inner customers;
   deal with inner proprietor;
   deal with inner dev;
   uint256 inner faucetBal = 1000;

   perform setUp() public digital {
       utils = new Utils();
       customers = utils.createUsers(2);
       proprietor = customers[0];
       vm.label(proprietor, "Proprietor");
       dev = customers[1];
       vm.label(dev, "Developer");

       token = new MockERC20();
       faucet = new Faucet(IERC20(token));
       token.mint(deal with(faucet), faucetBal);
   }
}
You’ll be able to see that we have now now created new state variables like faucet, token and in addition we’ve renamed alice and bob to proprietor and dev for straightforward interpretation. On this context, dev is somebody who requests tokens from the tap whereas the proprietor is the proprietor of the tap itself.
Within the final three traces of the setUp() technique, we deploy a mock token for the tap, go its deal with within the constructor of the new Faucet() (faucet deployment), after which name and mint some tokens to the deployed faucet contract.
Now, we’ll inherit the BaseSetup contract to jot down unit checks for our Faucet contract.
Beneath the BaseSetup contract, add the next code:
contract FaucetTest is BaseSetup {
   uint256 amountToDrip = 1;

   perform setUp() public override {
       tremendous.setUp();
   }
As talked about earlier, the setUp() technique runs earlier than all of the testcases and right here we’re calling the setUp() technique of the bottom contract which is the BaseSetup contract by way of tremendous.setUp().
Alright, now allow us to begin including unit checks for our contract. Proper beneath the setUp() technique of the FaucetTest contract, add the next piece of code:
   perform test_drip_transferToDev() public {
       console.log(
           "Ought to switch tokens to recipient when `drip()` known as"
       );
       uint256 _inititalDevBal = token.balanceOf(dev);

       /// Be sure that preliminary dev stability is Zero
       assertEq(_inititalDevBal, 0);

       /// Request some tokens to the dev pockets from the pockets
       faucet.drip(dev, amountToDrip);

       uint256 _devBalAfterDrip = token.balanceOf(dev);

      /// The distinction must be equal to the quantity requested from the tap
       assertEq(_devBalAfterDrip - _inititalDevBal, amountToDrip);
   }
The above code helps us to check the drip() technique. The workflow is straightforward.
- First, retailer the preliminary stability of the dev in a variable (_inititalDevBal)
- Be sure that it’s 0, as we didn’t mint any tokens to the dev. That is what the road
assertEq(_inititalDevBal, 0);does - Then name the
drip()technique from thefaucetcontract occasion - Fetch the stability of
devafter thedrip()known as - The distinction between the stability of the
devaccount earlier than and after thedrip()must be equal toamountToDrip, which is saved as a state variable within the FaucetTest contract
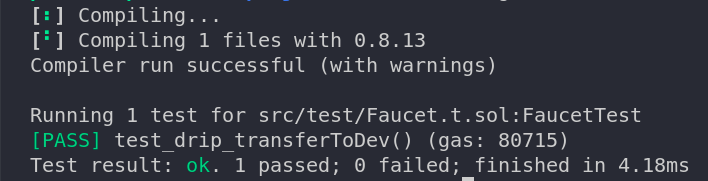
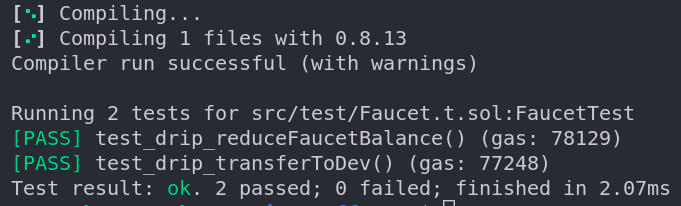
Now, allow us to save the file and run the take a look at: forge take a look at.
It’s best to see the output in your terminal one thing much like this:

Cool! Let’s add some extra checks.
The above take a look at verifies that the drip() technique transfers the tokens to the dev. So, we must also test that the switch is a sound one, which implies the token stability of the tap must be diminished.
Add the next take a look at beneath — the test_drip_transferToDev() technique.
 perform test_drip_reduceFaucetBalance() public {
       console.log("The tap stability must be diminished");
       faucet.drip(dev, amountToDrip);
       assertEq(token.balanceOf(deal with(faucet)), faucetBal - amountToDrip);
   }
This makes certain that the tokens that the dev obtained are literally despatched from the tap — if that’s the case, the stability of the tap must be diminished.
We are able to ensure that by working the take a look at suite once more : forge take a look at
If every part goes effectively, then your output must be much like this:

Candy! When you’ve got observed, we have now console.log statements in our take a look at circumstances, however they don’t seem to be exhibiting up within the console. The reason being that Forge doesn’t show logs by default. To get the logs displayed, we have to run the command with verbosity 2 : forge take a look at -vv will show the logs.

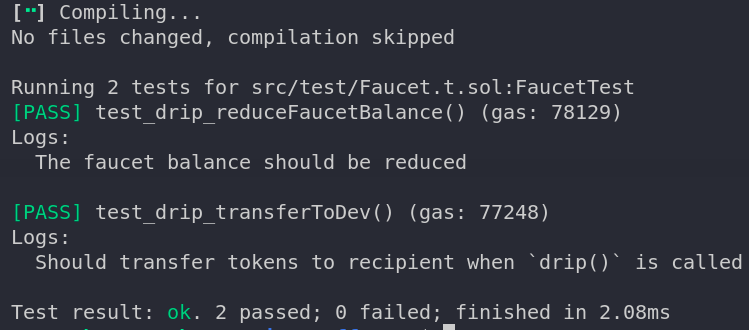
Additionally if there are any occasions which might be emitted by your contract, you possibly can view them within the checks with verbosity three (-vvv). You may get an in depth name hint on your checks as excessive as verbosity degree 5, which helps in higher debugging.
Alright, let’s maintain including extra checks. Now we’re going to take a look at our fee restrict mechanism. There must be a minimum of a five-minute interval earlier than calling drip() with the identical recipient deal with.
   perform test_drip_revertIfThrottled() public {
       console.log("Ought to revert if tried to throttle");
       faucet.drip(dev, amountToDrip);

       vm.expectRevert(abi.encodePacked("TRY_LATER"));
       faucet.drip(dev, amountToDrip);
   }
vm.expectRevert(bytes32) is one other cheat code that checks if the following name reverts with the given error message. On this case, the error message is TRY_LATER. It accepts the error message as bytes not as a string, therefore we’re utilizing abi.encodePacked.
When you bear in mind, I discussed that Forge ships with a fuzzer out-the-box. Let’s give it a strive.
We mix the checks test_drip_transferToDev and test_drip_reduceFaucetBalance, and as a substitute of passing the inputs manually, we might permit the fuzzer to enter the values in order that we will make it possible for our contract handles completely different inputs.
   perform test_drip_withFuzzing(deal with _recipient, uint256 _amount) public {
       console.log("Ought to deal with fuzzing");
       /// inform the constraints to the fuzzer, in order that the checks do not revert on unhealthy inputs.
       vm.assume(_amount <= 100);
       vm.assume(_recipient != deal with(0));
       uint256 _inititalBal = token.balanceOf(_recipient);
       faucet.drip(_recipient, _amount);
       uint256 _balAfterDrip = token.balanceOf(_recipient);
       assertEq(_balAfterDrip - _inititalBal, _amount);
       assertEq(token.balanceOf(deal with(faucet)), faucetBal - _amount);
   }
Fuzzing is property-based testing. Forge will apply fuzzing to any take a look at that takes a minimum of one parameter.
If you execute the take a look at suite, you will discover the next line within the output:
[PASS] test_drip_withFuzzing(deal with,uint256) (runs: 256)
From the above output we will infer that the Forge fuzzer known as the test_drip_withFuzzing() technique 256 instances with random inputs. Nonetheless, we will override this quantity utilizing the FOUNDRY_FUZZ_RUNS atmosphere variable.
Now, allow us to add a pair extra checks for the owner-only technique setLimit()
perform test_setLimit() public {
       console.log("Ought to set the restrict when known as by the proprietor");
       faucet.setLimit(1000);

       /// the restrict must be up to date assertEq(faucet.restrict(), 1000); } perform test_setLimit_revertIfNotOwner() public { console.log("Ought to revert if not known as by Proprietor"); /// Units the msg.sender as dev for the following tx vm.prank(dev); vm.expectRevert(abi.encodePacked("Ownable: caller isn't the proprietor")); faucet.setLimit(1000); }
Within the test_setLimit_revertIfNotOwner() technique, a brand new cheatcode vm.prank(deal with) is used. It pranks the vm by overriding the msg.sender with the given deal with; in our case it’s dev. So, the setLimit() ought to revert with the caller isn't the proprietor message as our Faucet contract inherits the Ownable contract.
Okay allow us to make it possible for no checks fail by working forge take a look at once more.

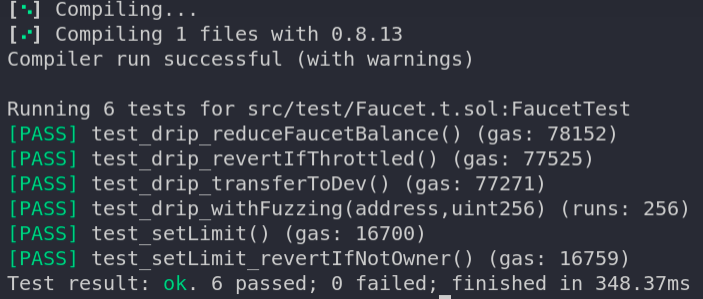
Candy 🥳 Now it’s time for deployment.
Contract deployment to Kovan testnet
Create a brand new file from .env.instance file and title it as .env. Please fill your INFURA_API_KEY and the PRIVATE_KEY (with Kovan testnet funds).
As soon as all of the fields are populated, you might be all set for deployment to Kovan. Earlier than deploying the tap, we have to deploy our ERC20 token.
You could find the deployment scripts contained in the scripts listing, and deploy the MockERC20 token to Kovan testnet by executing the ./scripts/deploy_token_kovan.sh bash script.
The output would look one thing like this:
Deployer: (YOUR_DEPLOYMENT_ADDRESS)

Deployed to: 0x1a70d8a2a02c9cf0faa5551304ba770b5496ed80

Transaction hash: 0xa3780d2e3e1d1f9346035144f3c2d62f31918b613a370f416a4fb1a6c2eadc77
To make it possible for the transaction really went by, you possibly can search the transaction hash in https://kovan.etherscan.io
Copy the Deployed to: deal with, as it’s the deal with of the MockERC20 token that we should always use for deploying our Faucet contract. To deploy the tap, you possibly can execute the ./scripts/deploy_faucet_kovan.shscript.
It should immediate you to enter the token deal with; then enter the copied MockERC20 token deal with that was deployed earlier.
The output ought to look one thing like this:
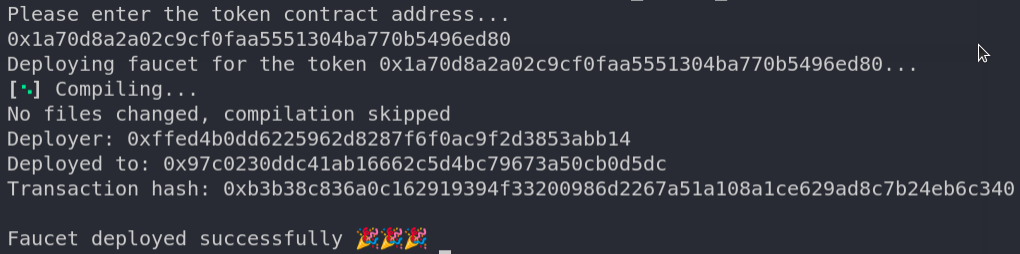

Woohoo 🚀🚀 We’ve efficiently compiled, examined, and deployed our contract to the Kovan testnet utilizing Forge
We nonetheless must confirm the contract on Etherscan and in addition mint some MockERC20 tokens to the Faucet (you need to use forged for this!) for it to work as meant. I’ll depart this to you guys as an train to strive it yourselves!
As at all times, you will discover the GitHub repository for this text here.
Conclusion
On this article we solely lined a couple of items of Forge. Foundry is a really highly effective framework for good contracts and it’s quickly creating as effectively.
There are extra cool options like code-coverage, contract verification, fuel snapshots, name traces, and interactive debugging. Be happy to mess around with the repo by testing out extra options. Blissful coding 🎊
Be a part of organizations like Bitso and Coinsquare who use LogRocket to proactively monitor their Web3 apps
Shopper-side points that affect customers’ potential to activate and transact in your apps can drastically have an effect on your backside line. When you’re all for monitoring UX points, routinely surfacing JavaScript errors, and monitoring gradual community requests and part load time, try LogRocket. https://logrocket.com/signup/
LogRocket is sort of a DVR for net and cell apps, recording every part that occurs in your net app or website. As an alternative of guessing why issues occur, you possibly can combination and report on key frontend efficiency metrics, replay consumer periods together with software state, log community requests, and routinely floor all errors.
Modernize the way you debug net and cell apps — Start monitoring for free.


