
Thirdweb is a platform that gives a set of instruments for creators, artists, and entrepreneurs to construct, launch and handle a Web3 mission simply.
It allows customers so as to add options resembling NFTs, marketplaces, and social tokens to their Web3 tasks with out writing a line of code.
On this article, you will higher perceive what DAO is, why it’s best to create a DAO, and how one can create a DAO with Thirdweb.
This may permit customers to mint your DAO’s NFT, obtain cryptocurrency through airdrops, and take part within the DAO’s polls.
Stipulations
Earlier than you’ll be able to proceed with this tutorial, it’s best to:
- Have Metamask put in
- Have information of JavaScript/React.js, and the blockchain
- Have arrange an account with Alchemy
What’s a DAO?
Decentralized autonomous organizations (DAOs) are a kind of governance generally used for DApps, tasks, and crypto-investment funds. DAOs are well-known for his or her openness, decentralization, and dealing with self-executing good contracts. There are such a lot of totally different definitions and explanations of what a DAO is.
On the whole phrases, DAOs are member-owned communities with out centralized management. The exact authorized standing of any such enterprise group is unclear. A DAO’s monetary transaction data and program guidelines are maintained on a blockchain.
Establishing the DAO Shopper-side
To start out constructing your DAO client-side software, you will be utilizing the thirdweb-CLI command.
First, Set up the Thirdweb CLI globally software by typing the beneath command:
yarn add @thirdweb-dev/cli
Thirdweb comprises starters that assist generate a base setup in your mission. Use the command beneath to generate a Thirdweb starter mission. Kind a mission title and title of your alternative for the mission listing. Comply with the prompts to finish the setup.
npx thirdweb create
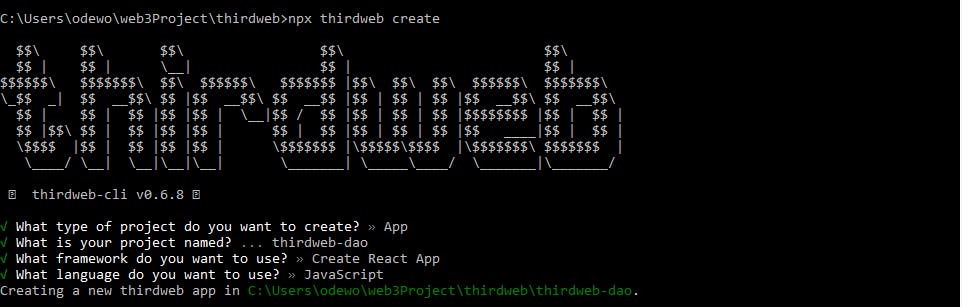
As soon as the set up is full, head over to the mission listing and run the command beneath to begin your software:
npm begin
Navigate to localhost:3000 to view your mission on a browser.
Get Metamask
Subsequent, you want an Ethereum pockets. There are a bunch of those, however for this mission, you’ll use Metamask. Obtain the browser extension and arrange your pockets right here. Even when you have already got one other pockets supplier, simply use Metamask for now.
However why Metamask?
Effectively. You want to have the ability to name capabilities in your good contract that reside on the blockchain. And to try this, it is advisable to have a pockets along with your Ethereum handle and personal key.
It is virtually like authentication. You want one thing to “Login” to the blockchain after which use these login credentials to make API requests out of your web site.
So, in your web site to speak to the blockchain, it is advisable to someway join your pockets to it. When you join your pockets to the web site, your web site could have permission to name good contracts in your behalf. Bear in mind, it is identical to authenticating into an internet site.
So, go forward and set all of it up! Their setup circulation is fairly self-explanatory.
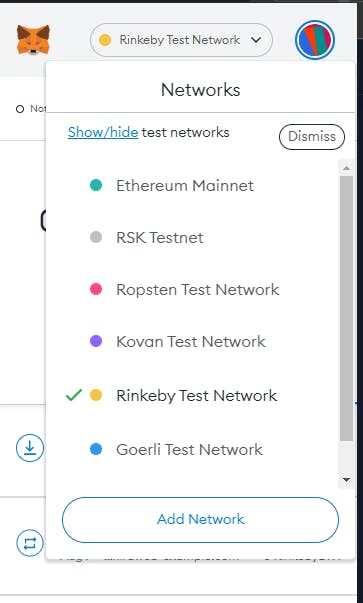
When you arrange your pockets, change the community to “Rinkeby”, the check community you will be working with.
Be sure to have testnet funds
You are not going to be deploying to the “Ethereum mainnet”. Why? As a result of it prices actual funds, and it isn’t value messing up. You are going to begin with a “testnet,” which is a clone of “mainnet,” however it makes use of faux funds; you’ll be able to check stuff out as a lot as you need. However, it is vital to know that testnets are run by precise miners and mimic real-world situations.
You will be utilizing Rinkeby, which the Ethereum Basis runs. To get some faux ETH, head to the RINKEBY FAUCET web site, paste your handle within the enter type, and click on on the “Ship Me ETH” button.
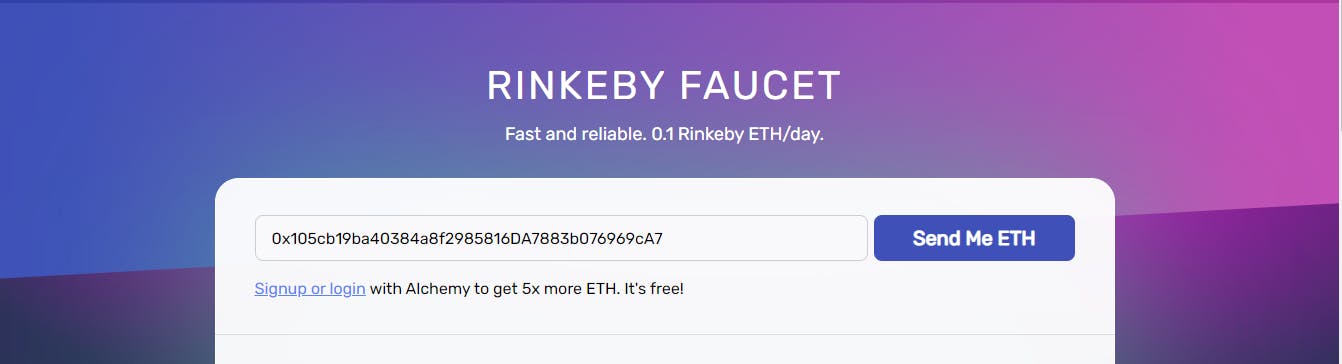
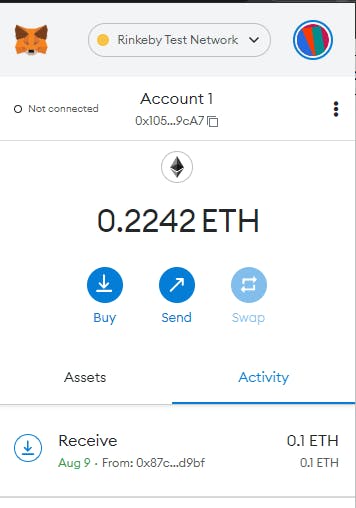
As soon as your transaction is mined, you will have some faux ETH in your pockets.
Specify your chain and pockets kind
So, in your web site to speak to the blockchain, it is advisable to someway join your pockets to it. When you join your pockets to your web site, the web site could have permission to name good contracts in your behalf. Bear in mind, it is identical to authenticating into an internet site.
You’ll have constructed “Hook up with Pockets” buttons up to now! This time, you will be utilizing thirdweb’s front-end SDK, which makes it loopy simple.
Head over to src/index.js in your React App and add the next code:
import React from 'react';
import ReactDOM from 'react-dom';
import './index.css';
import App from './App';
import { ChainId, ThirdwebProvider } from '@thirdweb-dev/react';

const activeChainId = ChainId.Rinkeby;

ReactDOM.render(
  <React.StrictMode>
    <ThirdwebProvider desiredChainId={activeChainId}>
      <App />
    </ThirdwebProvider>
  </React.StrictMode>,
  doc.getElementById('root'),
);
Within the code snippet above, you probably did the next:
- Imported thirdweb dependency
- Specified the
chainIdof the chain you are engaged on, which is Rinkeby! - Wrapped every thing with
<ThirdwebProvider>. This supplier holds the person’s authenticated pockets information
Observe: Should you’ve labored on dapps earlier than, be sure to disconnect your pockets from localhost:3000 on Metamask you probably have ever related it.
Add Hook up with Pockets
Should you head to your internet app, you will see a button to let customers join their wallets.
Head over to src/App.jsx. Add the next code.
import { useAddress, useMetamask } from "@thirdweb-dev/react";

const App = () => {
  const handle = useAddress();
  const connectWithMetamask = useMetamask();
  console.log("👋 Handle:", handle);

  if (!handle) {
    return (
      <div className="touchdown">
        <h1>Welcome to Web3WriterDAO</h1>
        <button onClick={connectWithMetamask} className="btn-hero">
          Join your pockets
        </button>
      </div>
    );
  }

  return (
    <div className="touchdown">
      <h1>👀 Welcome to Web3Writer DAO membership</h1>
    </div>
  );
};

export default App;
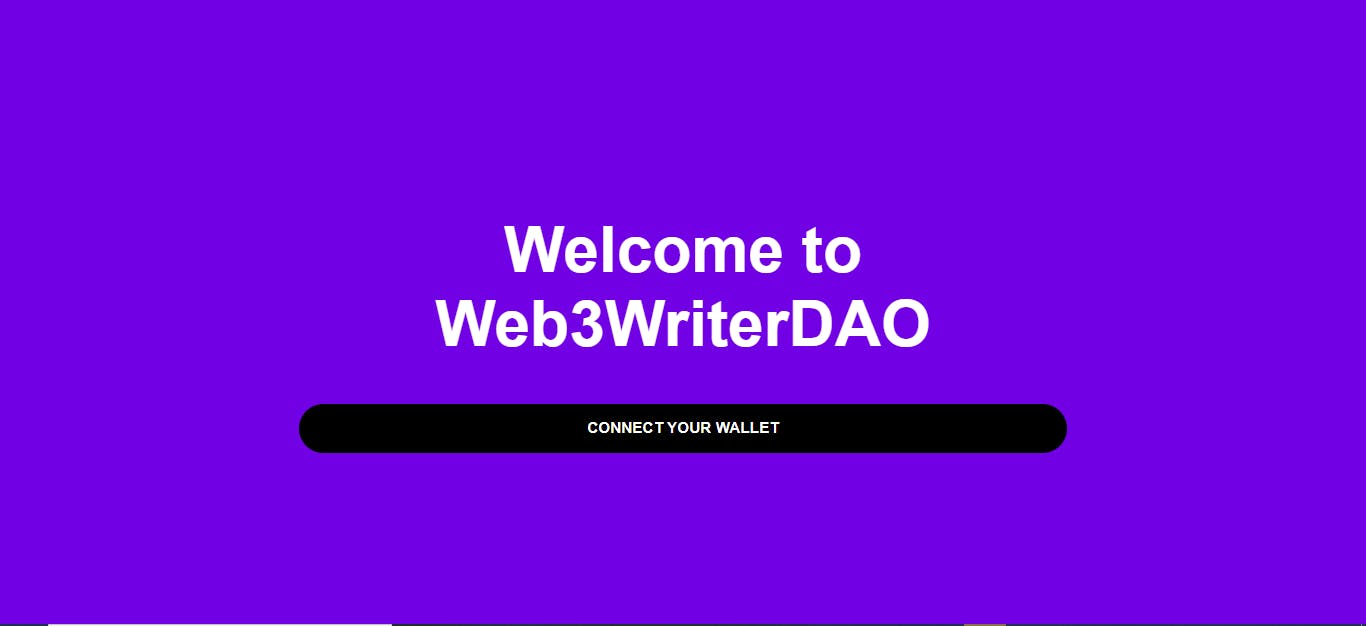
Now, once you go to your internet app, the net app appears to be like like this:
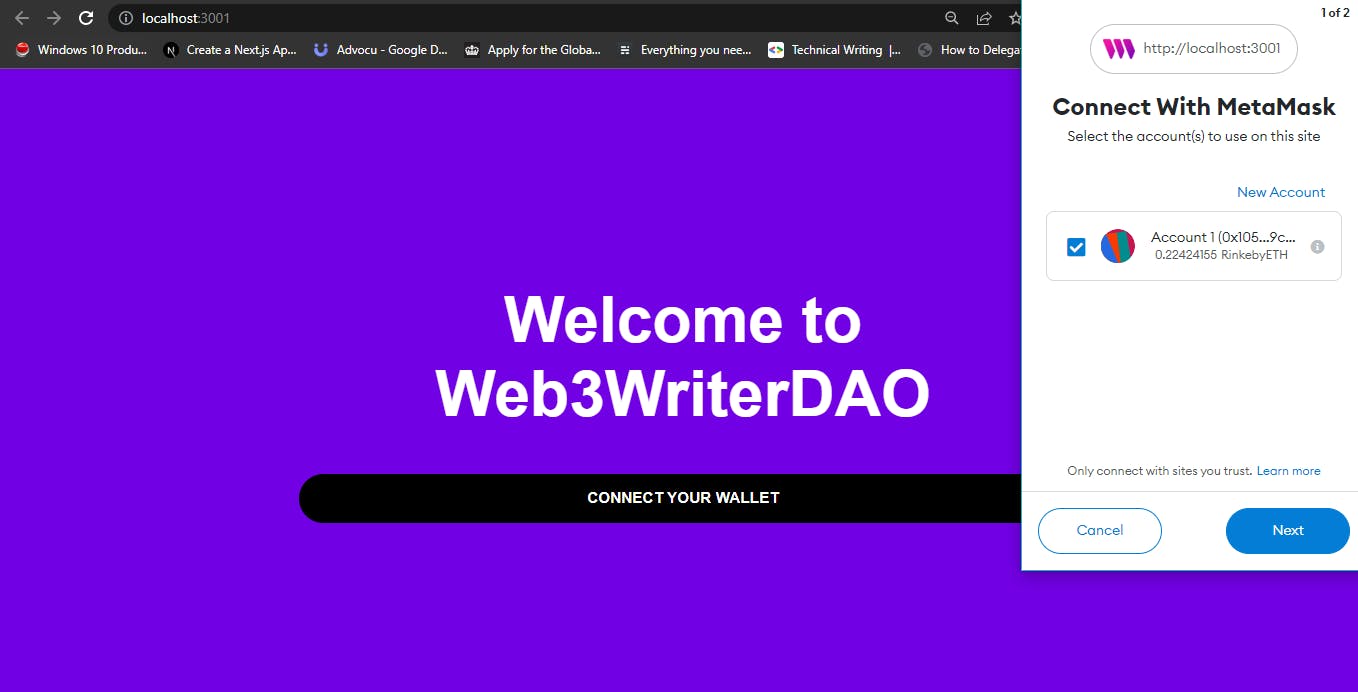
Subsequent, click on on the “Join your pockets” button, and you may see it pops Metamask!
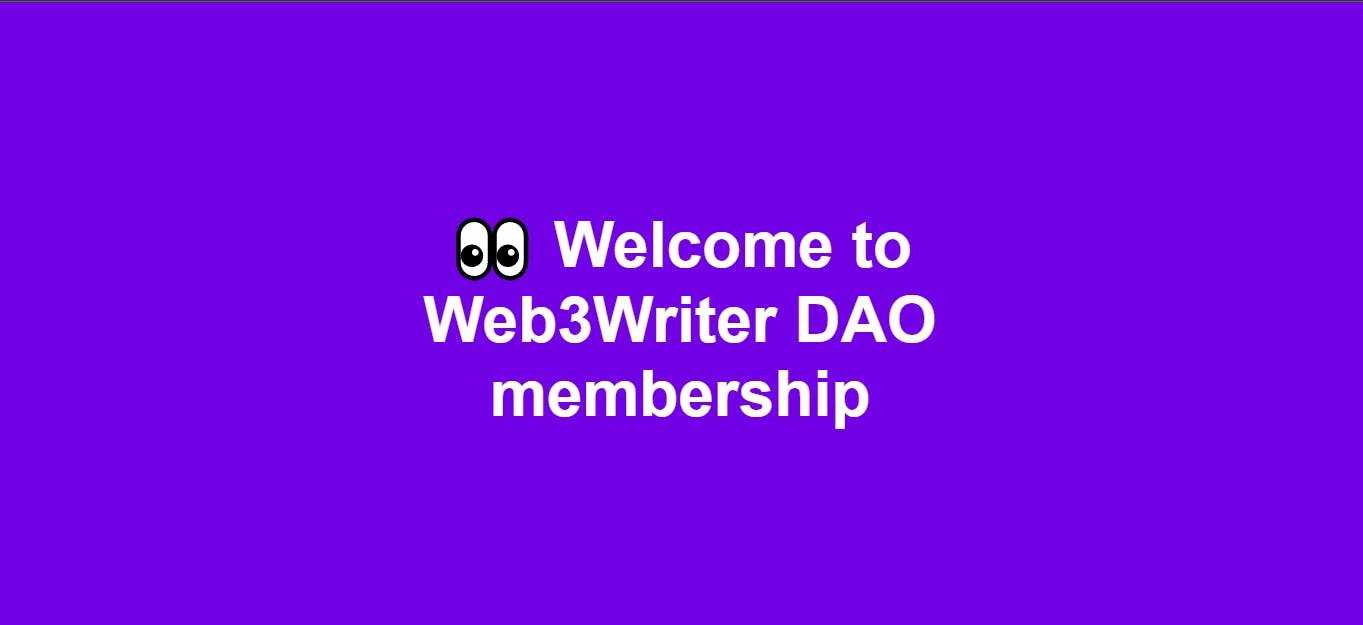
After you authorize your pockets, you will see this display:
And when you go to your console, you will see it prints out your public handle. Should you refresh your web page right here, you will see your pockets connection additionally sticks round.
Including .env variables
You must write some scripts that allow you to create and deploy your contract to Rinkeby utilizing Thirdweb. You will first create a .env file that appears like this on the root of your mission.
PRIVATE_KEY=YOUR_PRIVATE_KEY_HERE
WALLET_ADDRESS=YOUR_WALLET_ADDRESS
ALCHEMY_API_URL=YOUR_QUICKNODE_API_URL
As a result of we don’t wish to push these to GitHub, be sure you add them in .gitignore
Creating an Alchemy app
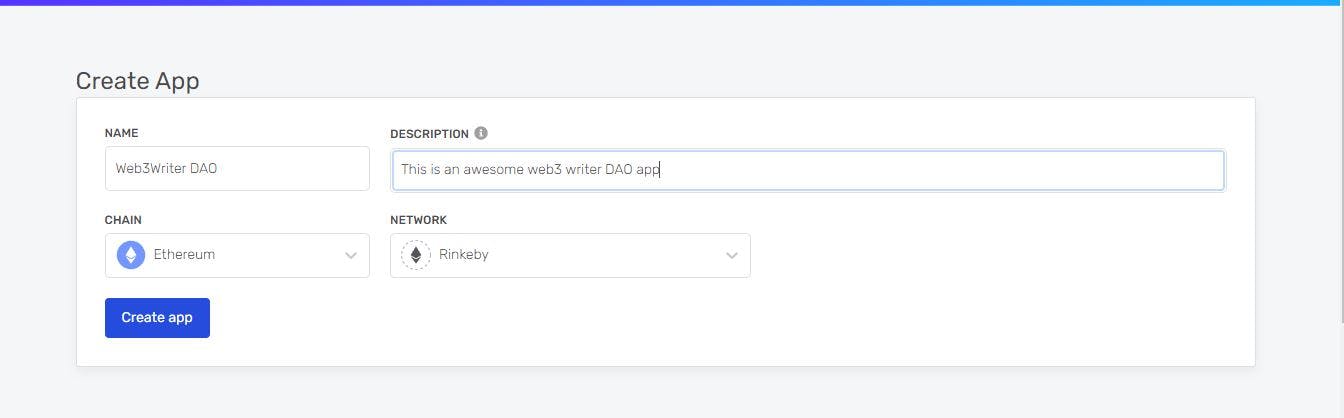
Subsequent, head to Alchemy, check in, click on on “Create App“, and supply the required particulars. Ensure that to make use of the identical chain because the one you used within the thirdweb – in your case, it’s the Ethereum chain and the Rinkeby community.
After the app is created, copy the HTTP API key.
Getting the pockets’s non-public key
To mint NFTs and carry out sure scripts, you have to the pockets’s non-public key.
To entry it, open the MetaMask browser extension and click on on Account Particulars. You must see your non-public key right here; export it and replica it someplace protected.
Getting Began with Thirdweb
Superior! Now you can hook up with a person’s pockets to verify in the event that they’re in your DAO! To affix your DAO, the person will want a membership NFT. If they do not have a membership NFT, you will immediate them truly to mint a membership NFT and be a part of your DAO!
However, there’s an issue. For us to mint NFTs, you could write and deploy your individual NFT good contract. That is truly the place Thirdweb is available in clutch.
Thirdweb offers us a set of instruments to create all our good contracts with out writing any Solidity. You write no Solidity. All it is advisable to do is write a script utilizing JavaScript to create and deploy your contracts.
Thirdweb will use a set of safe, normal contracts created right here. The cool half is after you create the contracts, you personal them, they usually’re related along with your pockets.
When you deploy the contract, you’ll be able to work together with these contracts out of your front-end simply utilizing their client-side SDK.
Thirdweb dashboard permits us to create contracts with out writing any code, however for this tutorial, we are going to create them with JavaScript. Additionally, thirdweb would not have a database; all of your information is saved on-chain.
Initialize Thirdweb SDK
Now, write scripts that allow you to initialize Thirdweb SDK. You will create scripts listing within the mission root folder and create a 1-initialize-sdk.js file
import { ThirdwebSDK } from "@thirdweb-dev/sdk";
import ethers from "ethers";
import dotenv from "dotenv";

dotenv.config();
if (!course of.env.PRIVATE_KEY || course of.env.PRIVATE_KEY === "") {
  console.log("🛑 Personal key not discovered.");
}

if (!course of.env.ALCHEMY_API_URL || course of.env.ALCHEMY_API_URL === "") {
  console.log("🛑 Alchemy API URL not discovered.");
}

if (!course of.env.WALLET_ADDRESS || course of.env.WALLET_ADDRESS === "") {
  console.log("🛑 Pockets Handle not discovered.");
}

const sdk = new ThirdwebSDK(
  new ethers.Pockets(
    course of.env.PRIVATE_KEY,
    ethers.getDefaultProvider(course of.env.ALCHEMY_API_URL)
  )
);

(async () => {
  attempt {
    const handle = await sdk.getSigner().getAddress();
    console.log("👋 SDK initialized by handle:", handle);
  } catch (err) {
    console.error("Did not get apps from the sdk", err);
    course of.exit(1);
  }
})();

export default sdk;
Within the code snippet above, all you are doing is initializing thirdweb after which including an export default sdk since you will be reusing the initialized sdk in different scripts. It is virtually like initializing a connection to a database from a server. You give it stuff like your non-public key and your supplier (which is Alchemy).
This may initialize the Thirdweb SDK, and as you’ll be able to see, we have to set up some packages:
npm i dotenv

yarn add dotenv
We’re utilizing modular imports right here, so create a brand new bundle.json file contained in the scripts folder and easily add the next:
{
  "title": "scripts",
  "kind": "module"
}
Let’s execute it! Go to your terminal and paste the next command:
node scripts/1-initialize-sdk.js
The script could take a while to run, however you’ll get your app handle after a while.

You will have this within the subsequent steps, so retailer it someplace protected.
You’ll now create and deploy an ERC-1155 contract to Rinkeby. That is mainly the bottom module you will have to create your NFTs. You are not creating your NFT right here but. You are simply organising metadata across the assortment itself. That is stuff just like the title of the gathering and a picture related to the gathering that reveals up on OpenSea because the header.
With an ERC-1155, a number of individuals might be the holder of the identical NFT. On this case, your “membership NFT” is identical for everybody, so as an alternative of constructing a brand new NFT each time, you’ll be able to merely assign the identical NFT to all of your members. That is additionally extra gasoline environment friendly! This can be a frequent method for instances the place the NFT is identical for all holders.
Create a brand new file referred to as 2-deploy-drop.js contained in the scripts folder. Right here, add the next script:
import { AddressZero } from "@ethersproject/constants";
import sdk from "./1-initialize-sdk.js";
import { readFileSync } from "fs";

(async () => {
  attempt {
    const editionDropAddress = await sdk.deployer.deployEditionDrop({
      title: "Web3Writer Membership",
      description: "A DAO for Web3 writers.",
      picture: readFileSync("scripts/belongings/naruto.png"),
      primary_sale_recipient: AddressZero,
    });
    const editionDrop = sdk.getEditionDrop(editionDropAddress);
    const metadata = await editionDrop.metadata.get();

    console.log(
      "✅ Efficiently deployed editionDrop contract, handle:",
      editionDropAddress
    );
    console.log("✅ editionDrop metadata:", metadata);
  } catch (error) {
    console.log("didn't deploy editionDrop contract", error);
  }
})();
From the code snippet above, you give your assortment a title, description, primary_sale_recipient, and picture. The picture you are loading is out of your native file, so be sure you embrace that picture beneath scripts/belongings. Ensure it is a PNG, JPG, or GIF for now and make sure it is a native picture — this would possibly not work when you use an web hyperlink!
After you will have up to date the small print, run the next script:
node scripts/2-deploy-drop.js
Await the script to run; it’s best to get an handle and metadata.
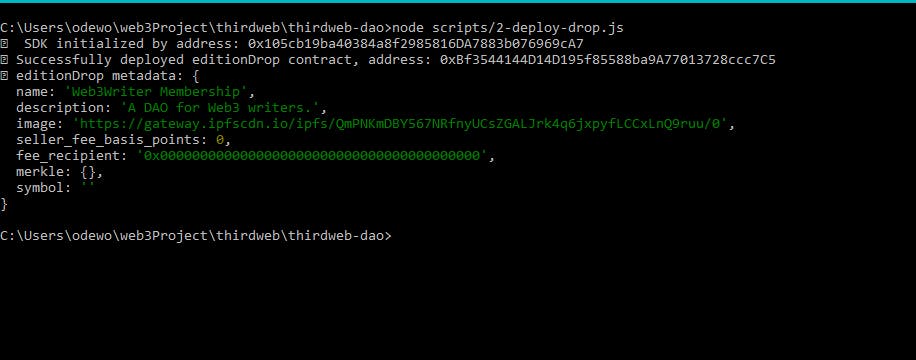
You simply deployed an ERC-1155 contract to Rinkeby. That is proper! Should you head over to https://rinkeby.etherscan.io/ and paste within the handle of the editionDrop contract, you will see you simply deployed a wise contract! The good half is that you just personal this contract deployed out of your pockets. The “From” handle will probably be your public handle.
Observe: Preserve the handle of your
editionDropround; you will want it later! when you ever lose it, you’ll be able to all the time retrieve it from the thirdweb dashboard
One other factor that occurred right here is that Thirdweb routinely uploaded and pinned your assortment’s picture to IPFS. You will see a hyperlink that begins with https://gateway.ipfscdn.io printed out. Should you paste that into your browser, you will see your NFT’s picture retrieved from IPFS through Cloudflare!
Configuring NFT Knowledge
Let’s truly deploy metadata related along with your membership NFT. You have not executed that but. All you probably did to this point was create the ERC-1155 contract and add some primary metadata.
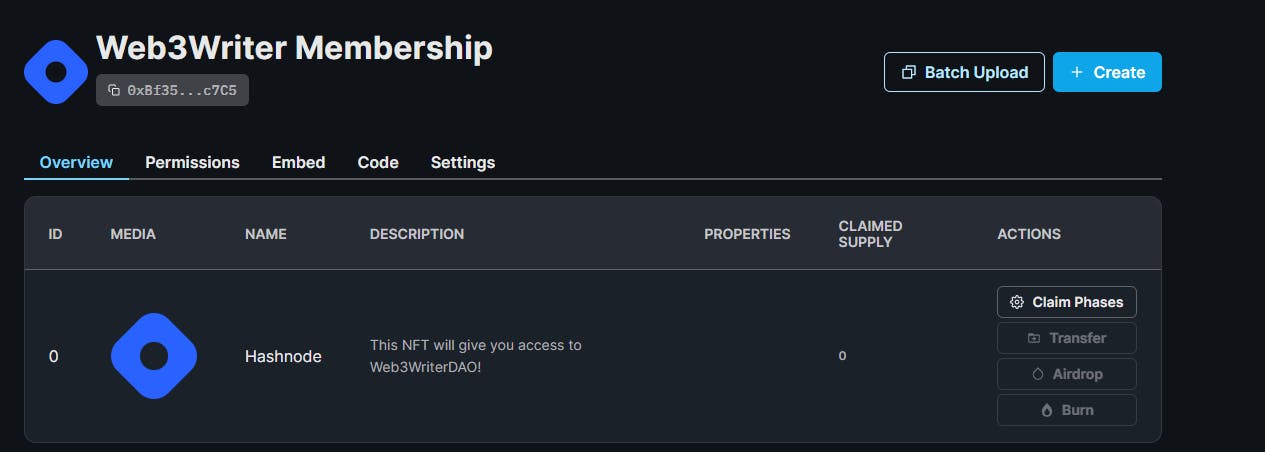
Create a brand new 3-config-nft.js file contained in the scripts folder and add the next:
import sdk from "./1-initialize-sdk.js";
import { readFileSync } from "fs";

const editionDrop = sdk.getEditionDrop("INSERT_EDITION_DROP_ADDRESS");

(async () => {
  attempt {
    await editionDrop.createBatch([
      {
        name: "Hashnode",
        description: "This NFT will give you access to Web3WriterDAO!",
        image: readFileSync("scripts/assets/hashnodep.png"),
      },
    ]);
    console.log("✅ Efficiently created a brand new NFT within the drop!");
  } catch (error) {
    console.error("didn't create the brand new NFT", error);
  }
})();
From the code snippet above, The very first thing you will be doing is accessing your editionDrop contract, which is an ERC-1155. The INSERT_EDITION_DROP_ADDRESS is the handle printed out from the step earlier than. It is the handle printed out after Efficiently deployed editionDrop contract, handle. It’s also possible to discover this in your thirdweb dashboard.

Then, you are organising your precise NFT in your ERC-1155 utilizing createBatch. You must arrange some properties:
title: The title of your NFT.description: The outline of your NFTpicture: The picture in your NFT. That is the picture of the NFT that customers will declare to have the ability to entry your DAO.
Bear in mind, as a result of it is an ERC-1155, all of your members will mint the identical NFT.
After getting up to date all of them, run the next script:
node scripts/3-config-nft.js
It ought to provide you with an output like this.

Should you see the module within the Thirdweb dashboard, you will notice that an NFT has been created! 🥳
Setup declare situation
Setting a declare situation will permit us to set a restrict for the NFTs and permit a particular max restrict per transaction.
Create a brand new 4-set-claim-condition.js file contained in the scripts folder and add the next:
import sdk from "./1-initialize-sdk.js";
import { MaxUint256 } from "@ethersproject/constants";

const editionDrop = sdk.getEditionDrop("INSERT_EDITION_DROP_ADDRESS");

(async () => {
  attempt {

    const claimConditions = [{

      startTime: new Date(),

      maxQuantity: 50_000,

      price: 0,

      quantityLimitPerTransaction: 1,

      waitInSeconds: MaxUint256,
    }]

    await editionDrop.claimConditions.set("0", claimConditions);
    console.log("✅ Efficiently set declare situation!");
  } catch (error) {
    console.error("Did not set declare situation", error);
  }
})();
Within the code snippet above, you embrace the next properties:
-
startTimeis when customers are allowed to begin minting NFTs; on this case, you simply set that date/time to the present time, which means minting can begin instantly -
maxQuantityis the max variety of membership NFTs that may be minted. quantityLimitPerTransaction specifies what number of tokens somebody can declare in a single transaction; you set this to at least one since you solely need customers minting one NFT at a time worthunits the value of your NFT; in your case, 0 totally freewaitInSecondsis the period of time between transactions; since you solely need individuals claiming as soon as, you set it to the utmost quantity that the blockchain permits- Lastly, the
editionDrop.claimConditions.set("0", claimConditions)and it will truly work together along with your deployed contract on-chain and alter the situations
After working node scripts/4-set-claim-condition.js, here is what you will get:

Letting customers mint their NFT
At this stage now, you will be checking two issues:
-
In case your person has a membership NFT, present them your “DAO Dashboard” display the place they’ll vote on proposals and see DAO-related data.
-
If the person would not have your NFT, you will give them a button to mint one.
Checking if customers personal a membership NFT
Head over to App.jsx. Replace your imports to:
import { useAddress, useMetamask, useEditionDrop } from '@thirdweb-dev/react';
import { useState, useEffect } from 'react';
From there, beneath your console.log("👋 Handle:", handle); you are going to add:
const editionDrop = useEditionDrop("INSERT_EDITION_DROP_ADDRESS");
  const [hasClaimedNFT, setHasClaimedNFT] = useState(false);

  useEffect(() => {
    if (!handle) {
      return;
    }

    const checkBalance = async () => {
      attempt {
        const stability = await editionDrop.balanceOf(handle, 0);
        if (stability.gt(0)) {
          setHasClaimedNFT(true);
          console.log("🌟 this person has a membership NFT!");
        } else {
          setHasClaimedNFT(false);
          console.log("😭 this person would not have a membership NFT.");
        }
      } catch (error) {
        setHasClaimedNFT(false);
        console.error("Did not get stability", error);
      }
    };
    checkBalance();
  }, [address, editionDrop]);
Within the code snippet above, you probably did the next:
- First, initialize your
editionDropcontract - Create a state
hasClaimedNFTto know if the person has your NFT - Use
editionDrop.balanceOf(handle, "0")to verify if the person has our NFT.
Should you open the console on the web site, it ought to present that you just don’t have an NFT.

Making a button to mint NFTs
Let’s create the button to mint NFTs. However first, within the App.jsx,and let’s add the isClaiming state:
const [isClaiming, setIsClaiming] = useState(false);
Create a brand new operate referred to as mintNft like so:
const mintNft = async () => {
    attempt {
      setIsClaiming(true);
      await editionDrop.declare("0", 1);
      console.log(`🌊 Efficiently Minted! Test it out on OpenSea: https:
      setHasClaimedNFT(true);
    } catch (error) {
      setHasClaimedNFT(false);
      console.error("Did not mint NFT", error);
    } lastly {
      setIsClaiming(false);
    }
  };
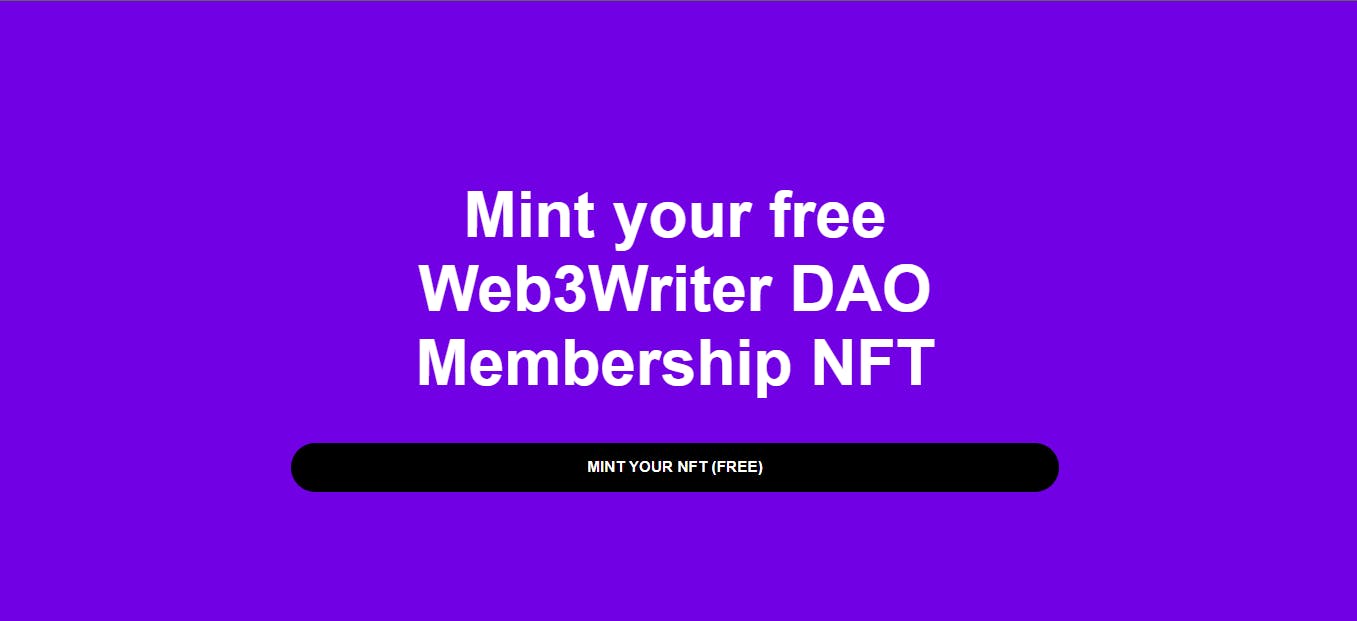
Let’s create the button now! Inside the ultimate return block, add the next:
<div className="mint-nft">
      <h1>Mint your free 🍪DAO Membership NFT</h1>
      <button
        disabled={isClaiming}
        onClick={mintNft}
      >
        {isClaiming ? "Minting..." : "Mint your nft (FREE)"}
      </button>
</div>
After you check in, it ought to present you a display like this.
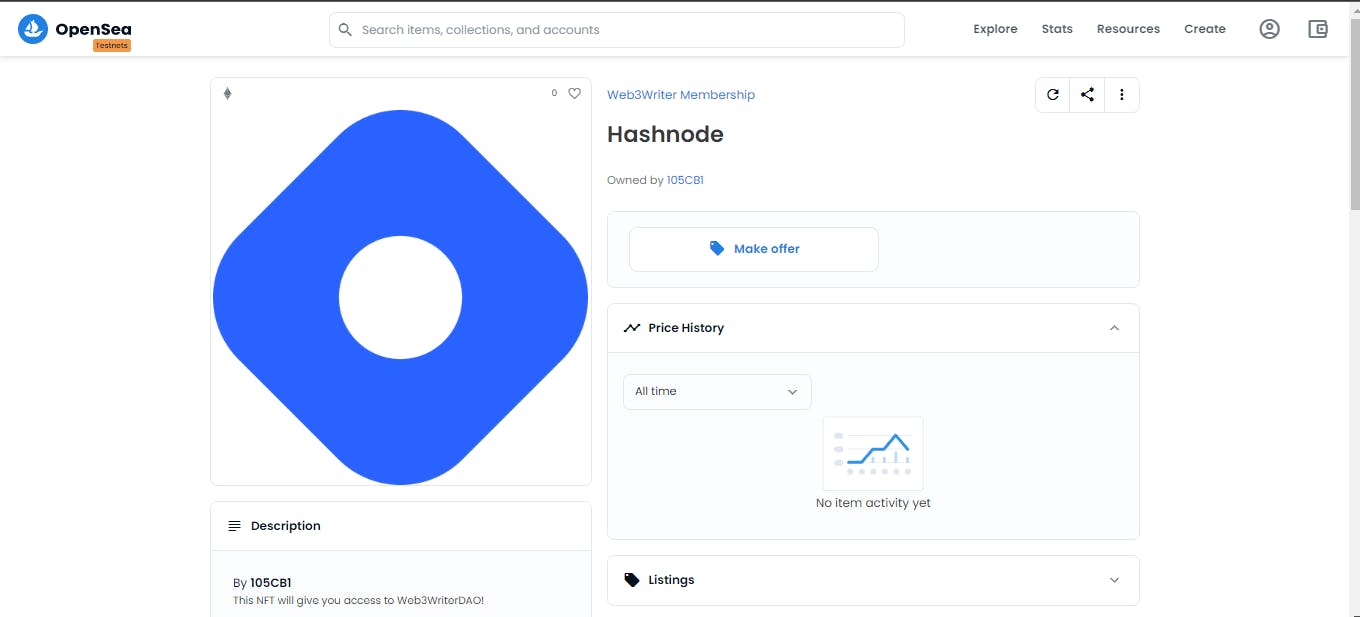
Should you click on on the Mint your nft (FREE) button, it ought to pop up in your MetaMask display to finish the transaction. Within the console, it’s best to see the next.

As soon as it is executed minting, it’s best to see Efficiently Minted! in your console together with the Testnet OpenSea hyperlink. On testnets.opensea.io, you’ll be able to truly see NFTs minted on the testnet. If you head to your hyperlink, you will see one thing like this:
Present DAO Dashboard provided that the person owns the NFT
Lastly, simply above the ultimate return block, add this verify to see if the person has claimed the NFT already:
if (hasClaimedNFT) {
    return (
      <div className="member-page">
        <h1>Web3Writer DAO Member Web page</h1>
        <p>Congratulations on being a member</p>
      </div>
    );
  }
We’ve accomplished constructing the minting NFT performance.
Making a model new Token
Let’s create and deploy a token good contract! Create a brand new scripts/5-deploy-token.js file contained in the scripts folder and add the next:
import { AddressZero } from "@ethersproject/constants";
import sdk from "./1-initialize-sdk.js";

(async () => {
  attempt {
    const tokenAddress = await sdk.deployer.deployToken({
      title: "Web3Writer Token",
      image: "W3W",
      primary_sale_recipient: AddressZero,
    });
    console.log(
      "✅ Efficiently deployed token module, handle:",
      tokenAddress
    );
  } catch (error) {
    console.error("didn't deploy token module", error);
  }
})();
Run the scripts/5-deploy-token.js file, and you will get this:

Increase! It deployed a recent token contract. Should you head to https://rinkeby.etherscan.io/ and search the token module’s handle, you’ll see the contract you simply deployed.
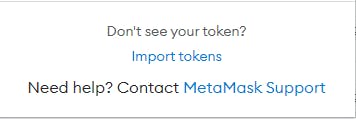
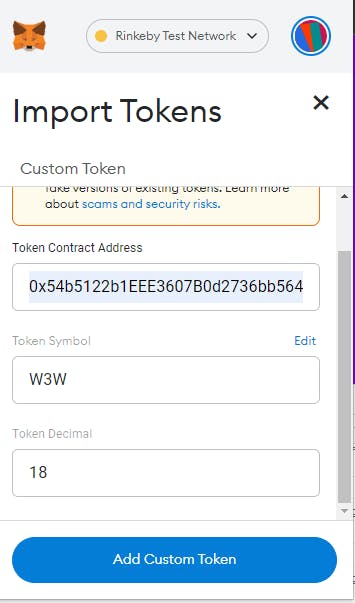
You’ll be able to even add your token to Metamask as a customized token. By clicking on Import Token
Then, paste in your ERC-20 contract handle, and also you’ll see Metamask magically seize your token image routinely:
Then, head again to your pockets, scroll down, and growth!
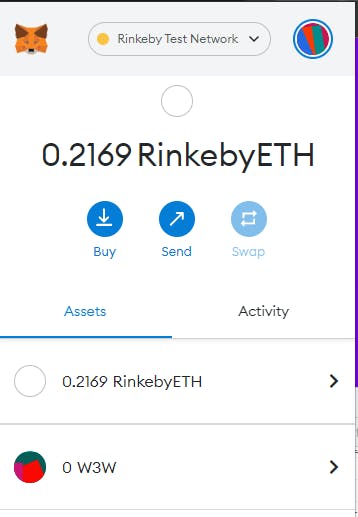
You formally have your individual token.
Minting your individual tokens
Create a brand new file referred to as 6-mint-token.js contained in the scripts folder and add the next:
import sdk from "./1-initialize-sdk.js";

const token = sdk.getToken("INSERT_TOKEN_ADDRESS");

(async () => {
  attempt {
    const quantity = 1_000_000;

    await token.mintToSelf(quantity);
    const totalSupply = await token.totalSupply();

    console.log(
      "✅ There now's",
      totalSupply.displayValue,
      "$W3W in circulation"
    );
  } catch (error) {
    console.error("Did not print cash", error);
  }
})();
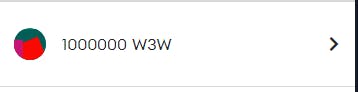
Right here’s what you will get once you run the script node scripts/6-mint-token.js:

You must now see the quantity of tokens you minted in your MetaMask pockets!
Airdropping tokens
You would possibly wish to airdrop the tokens to your NFT holders, so let’s construct a script for that. Create a brand new 7-airdrop-token.js file inside scripts and add the next:
import sdk from "./1-initialize-sdk.js";

const editionDrop = sdk.getEditionDrop("INSERT_EDITION_DROP_ADDRESS");
const token = sdk.getToken("INSERT_TOKEN_ADDRESS");

(async () => {
  attempt {
    const walletAddresses = await editionDrop.historical past.getAllClaimerAddresses(0);

    if (walletAddresses.size === 0) {
      console.log(
        "No NFTs have been claimed but; possibly get some associates to say your free NFTs!"
      );
      course of.exit(0);
    }

    const airdropTargets = walletAddresses.map((handle) => {
      const randomAmount = Math.flooring(
        Math.random() * (10000 - 1000 + 1) + 1000
      );
      console.log("✅ Going to airdrop", randomAmount, "tokens to", handle);


      const airdropTarget = {
        toAddress: handle,
        quantity: randomAmount,
      };

      return airdropTarget;
    });


    console.log("🌈 Beginning airdrop...");
    await token.transferBatch(airdropTargets);
    console.log(
      "✅ Efficiently airdropped tokens to all of the holders of the NFT!"
    );
  } catch (err) {
    console.error("Did not airdrop tokens", err);
  }
})();
After you run the script, it’s best to get one thing like this.

At present, solely you will have minted an NFT, so it received’t ship the token to another person. However this can be utilized to ship to different NFT holders later.
Constructing a Treasury and Governance
A governance token is cool, however it’s ineffective if individuals can’t use it to control something! What you’re going to do subsequent right here is about up a governance contract that lets individuals vote on proposals utilizing their tokens.
Create a brand new deploy-vote.js file within the scripts folder and add the next:
import sdk from "./1-initialize-sdk.js";

(async () => {
  attempt {
    const voteContractAddress = await sdk.deployer.deployVote({
      title: "Web3Writer DAO proposal",
      voting_token_address: "INSERT_TOKEN_ADDRESS",
      voting_delay_in_blocks: 0,
      voting_period_in_blocks: 6570,
      voting_quorum_fraction: 0,
      proposal_token_threshold: 0,
    });

    console.log(
      "✅ Efficiently deployed vote contract, handle:",
      voteContractAddress,
    );
  } catch (err) {
    console.error("Did not deploy vote contract", err);
  }
})();
Go forward and run this utilizing node scripts/deploy-vote.js. Right here’s what you will find yourself getting:

Setup your treasury
You additionally have to arrange a voting module, so create a brand new script referred to as setup-vote.js and add the next:
import sdk from "./1-initialize-sdk.js";

const vote = sdk.getVote("INSERT_VOTE_ADDRESS");
const token = sdk.getToken("INSERT_TOKEN_ADDRESS");

(async () => {
  attempt {
    await token.roles.grant("minter", vote.getAddress());

    console.log(
      "Efficiently gave vote contract permissions to behave on token contract"
    );
  } catch (error) {
    console.error(
      "didn't grant vote contract permissions on token contract",
      error
    );
    course of.exit(1);
  }

  attempt {
    const ownedTokenBalance = await token.balanceOf(
      course of.env.WALLET_ADDRESS
    );

    const ownedAmount = ownedTokenBalance.displayValue;
    const percent90 = Quantity(ownedAmount) / 100 * 90;
    await token.switch(
      vote.getAddress(),
      percent90
    );

    console.log("✅ Efficiently transferred " + percent90 + " tokens to vote contract");
  } catch (err) {
    console.error("didn't switch tokens to vote contract", err);
  }
})();
When you end up, you’ll be able to run this utilizing node scripts/9-setup-vote.js. Right here’s what you will get as your output:

Let customers vote on proposals.
Cool. All the pieces is about up. Now, you simply have to create your first proposal! Create a brand new file referred to as create-vote-proposals.js contained in the scripts folder and add the next:
import sdk from "./1-initialize-sdk.js";
import { ethers } from "ethers";

const vote = sdk.getVote("INSERT_VOTE_ADDRESS");
const token = sdk.getToken("INSERT_TOKEN_ADDRESS");

(async () => {
  attempt {
    const quantity = 420_000;
    const description = "Ought to the DAO mint a further " + quantity + " tokens into the treasury?";
    const executions = [
      {
        toAddress: token.getAddress(),
        nativeTokenValue: 0,
        transactionData: token.encoder.encode(
          "mintTo", [
          vote.getAddress(),
          ethers.utils.parseUnits(amount.toString(), 18),
        ]
        ),
      }
    ];

    await vote.suggest(description, executions);

    console.log("✅ Efficiently created proposal to mint tokens");
  } catch (error) {
    console.error("didn't create first proposal", error);
    course of.exit(1);
  }

  attempt {
    const quantity = 6_900;
    const description = "Ought to the DAO switch " + quantity + " tokens from the treasury to " +
      course of.env.WALLET_ADDRESS + " for being superior?";
    const executions = [
      {
        nativeTokenValue: 0,
        transactionData: token.encoder.encode(

          "transfer",
          [
            process.env.WALLET_ADDRESS,
            ethers.utils.parseUnits(amount.toString(), 18),
          ]
        ),
        toAddress: token.getAddress(),
      },
    ];

    await vote.suggest(description, executions);

    console.log(
      "✅ Efficiently created proposal to reward ourselves from the treasury, let's hope individuals vote for it!"
    );
  } catch (error) {
    console.error("didn't create second proposal", error);
  }
})();
You must replace the module addresses, and if you wish to replace the message of the proposal, you can too replace that.
Lastly, run the script. It ought to provide you with one thing like this.

Should you now verify the Thirdweb dashboard, the proposal has been created.
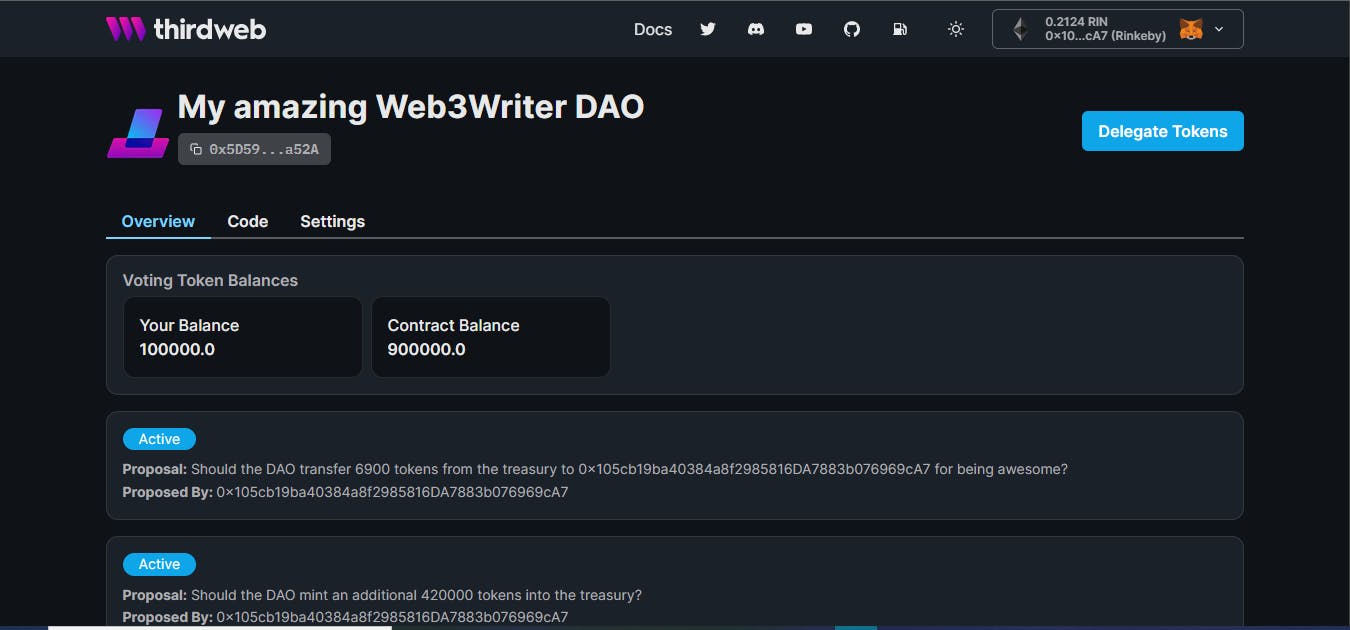
Let customers vote on proposals from the dashboard
Lastly, let’s carry all of it to the net web page. Proper now, your proposals reside on good contracts. However, you need your customers to have the ability to see them and vote simply!
First, Head to App.jsx. Add the useVote hook to your imports:
import { useAddress, useMetamask, useEditionDrop, useToken, useVote } from '@thirdweb-dev/react';
We’re going to want three useStates, like so:
const [proposals, setProposals] = useState([]);
const [isVoting, setIsVoting] = useState(false);
const [hasVoted, setHasVoted] = useState(false);
Getting the proposals
The net app wants entry to your vote so customers can work together with that contract.
Let’s add the next code someplace beneath the shortenAddress operate:
useEffect(() => {
  if (!hasClaimedNFT) {
    return;
  }

  const getAllProposals = async () => {
    attempt {
      const proposals = await vote.getAll();
      setProposals(proposals);
      console.log(" Proposals:", proposals);
    } catch (error) {
      console.log("didn't get proposals", error);
    }
  };
  getAllProposals();
}, [hasClaimedNFT, vote]);

useEffect(() => {
  if (!hasClaimedNFT) {
    return;
  }

  if (!proposals.size) {
    return;
  }

  const checkIfUserHasVoted = async () => {
    attempt {
      const hasVoted = await vote.hasVoted(proposals[0].proposalId, handle);
      setHasVoted(hasVoted);
      if (hasVoted) {
        console.log("🥵 Person has already voted");
      } else {
        console.log("🙂 Person has not voted but");
      }
    } catch (error) {
      console.error("Did not verify if the pockets has voted", error);
    }
  };
  checkIfUserHasVoted();

}, [hasClaimedNFT, proposals, address, vote]);
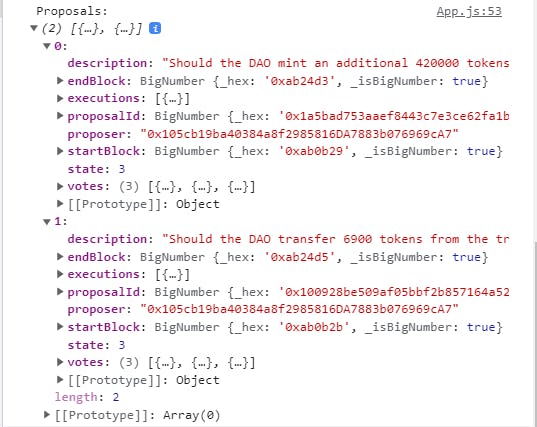
The code above has two React useEffect Hook which did the next:
- The primary
useEffectused thevote.getAll()to seize all of the proposals that exist in your governance contract after which doingsetProposalsto render them later - The second
useEffectused thevote.hasVoted(proposals[0].proposalId, handle)to checks if this handle has voted on the primary proposal. If it has, thesetHasVotedso the person can’t vote once more!
Thirdweb not solely makes it very easy to deploy good contracts, however it additionally makes it very simple to work together with them out of your consumer with easy capabilities like
vote.getAll()!
Go forward and refresh your web page, it’s best to see your proposals printed out, and you may discover all the info.
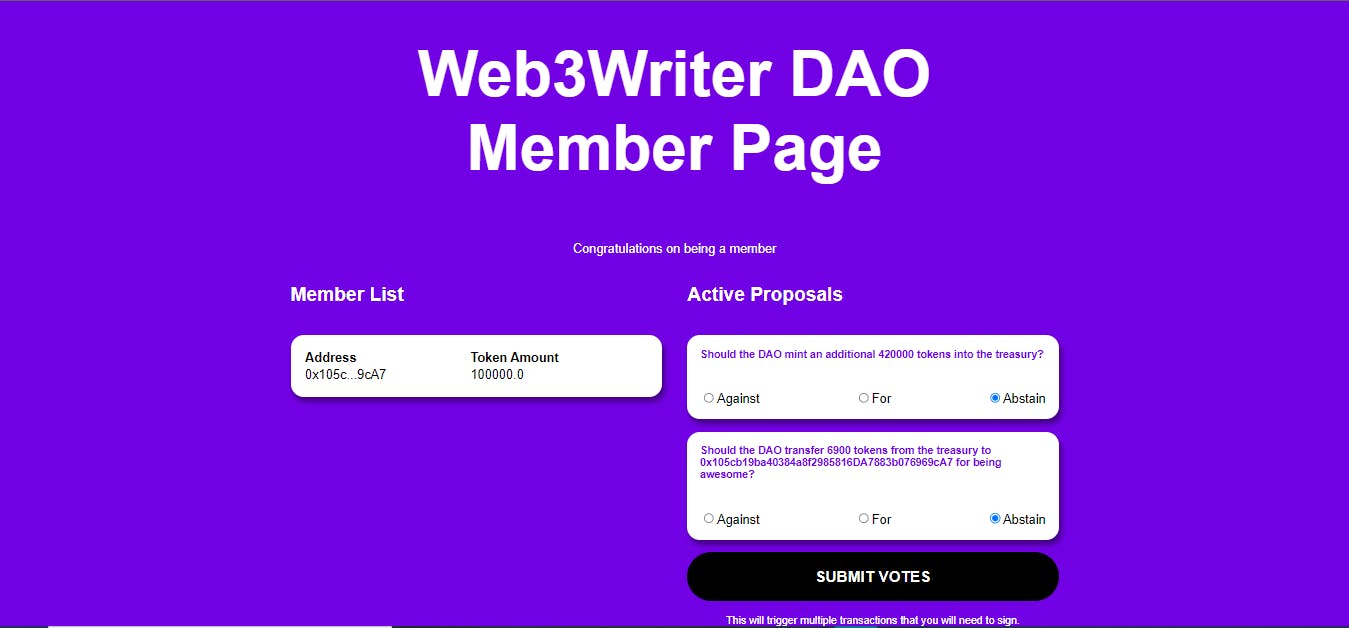
Rendering the proposals
Add the zero handle import after your present imports:
import { AddressZero } from "@ethersproject/constants";
Go forward and change the code of if(hasClaimedNFT) { } with the code here.
If you take a look at your internet app, you’ll see one thing like:
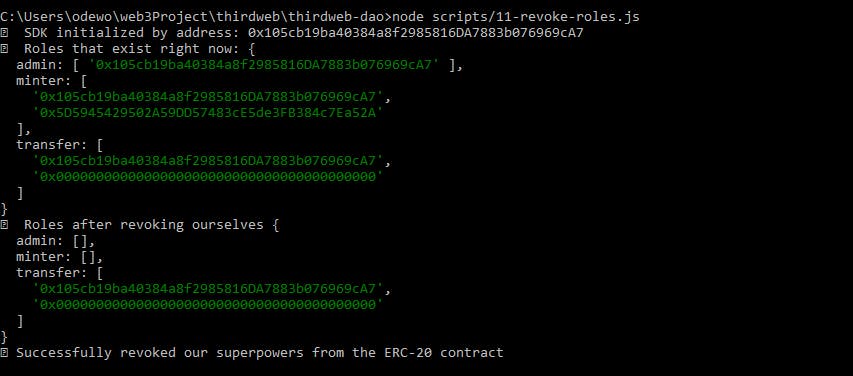
Eradicating Admin Privileges
Should you bear in mind, you truly nonetheless maintain “minting” rights on the ERC-20 contract. Which means you’ll be able to go and create extra tokens if you would like, which can freak out members of your DAO.
So, It’s greatest to revoke your “minting” function utterly. That manner, solely the voting contract can mint new tokens.
We are able to do that by creating revoke-roles.js file within the scripts folder and the next:
import sdk from "./1-initialize-sdk.js";

const token = sdk.getToken("INSERT_TOKEN_ADDRESS");

(async () => {
  attempt {
    const allRoles = await token.roles.getAll();

    console.log("👀 Roles that exist proper now:", allRoles);

    await token.roles.setAll({ admin: [], minter: [] });
    console.log(
      "🎉 Roles after revoking ourselves",
      await token.roles.getAll()
    );
    console.log("✅ Efficiently revoked our superpowers from the ERC-20 contract");

  } catch (error) {
    console.error("Did not revoke ourselves from the DAO treasury", error);
  }
})();
If you run this utilizing node scripts/11-revoke-roles.js. you will get:
Deal with primary unsupported community error
To acknowledge a connection outdoors the Rinkeby community, let’s import one final hook, useNetwork on the high of App.jsx. We’re additionally importing ChainId from the Thirdweb SDK to get Rinkeby’s chain ID.
import { useAddress, useMetamask, useEditionDrop, useToken, useVote, useNetwork } from '@thirdweb-dev/react';
import { ChainId } from '@thirdweb-dev/sdk'
Then, outline your useNetwork hook beneath your useAddress hook:
const community = useNetwork();
Subsequent, add the next in your App.jsx file proper beneath the mintNft operate:
if (handle && (community?.[0].information.chain.id !== ChainId.Rinkeby)) {
  return (
    <div className="unsupported-network">
      <h2>Please hook up with Rinkeby</h2>
      <p>
        This dapp solely works on the Rinkeby community. Please change networks
        in your related pockets.
      </p>
    </div>
  );
}
We’re checking if we’re discovering a sequence on our most popular community. In our case Rinkeby, if we’re not, we’re prompting customers to modify networks.
Conclusion
You’ve executed it. You made it to the tip. On this article, you deployed your individual customized ERC-20 token and deployed your individual ERC-1155 NFT individuals can mint to affix your DAO.
You additionally realized to deploy your individual governance contract and treasury. Constructed a dapp that lets individuals join their pockets, get an NFT, see a DAO Dashboard the place they’ll see different members, and vote on proposals executed instantly by your governance contract.
To be taught extra about NFTs, dApps, the blockchain, and different web3 content material, take a look at Hashnode’s web3 blog.


